Click on thumbnail to
see larger picture.
|
|
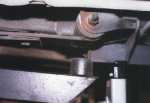
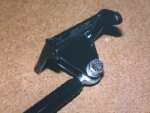
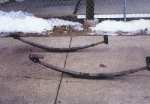
I've had no complaints about my Lakewood traction bars. Unlike some traction bars, my Lakewoods hit the spring directly
under the spring eye (photo 1). They have allowed me to
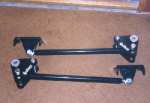
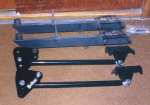
get a best of 1.83 second 60' time with 235/60-R15 BF Goodrich Drag Radial tires. Being one who always is looking for an
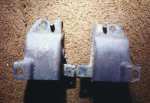
advantage and a better setup I decided to try John Calvert's CalTrac traction bars (photo 2). The design is different from slapper bars. Slapper bars use the axle
rotation to apply force upward at the spring mount and prevent spring wrap-up. CalTrac bars use the same axle rotation to
create downward force on the spring to prevent wrap up and forward motion at the spring mount to move the car. The links
on CalTrac bars act like the lower links on a 4-link suspension. The leaf springs themselves become the upper links in a
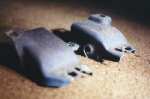
4-link system. The forward assembly (photo 3) uses the
spring eye bolt as a pivot point. When the axle rotates, the bars push forward causing the plates to pivot at the bolt and
apply downward pressure to the top of the leaf spring. This moves the instant center of the car further forward to apply
more of the car weight to the rear wheels. Since the preload can be adjusted and the front mount can be moved, the CalTrac
bars can be more finely tuned for track conditions. Using the lower front mount hole moves the instant center further
forward and applies more pressure to the spring top.
The price is more than double that of the Lakewood bars but I've heard nothing but good things about them so I thought I'd
give them a try. The people on the other end of the phone were very helpful and took lots of time to find out what I needed
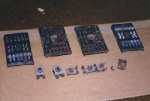
and to give me all the information I needed. When the package arrived, I was surprised by how heavy duty the pieces were
and how much they weighed. I thought for sure they weighed more than the Lakewood slapper bars that were already on the
car. To my surprise the Lakewood bars weighed 25-lbs and the complete CalTrac bar system weighed 24-lbs. The quality of
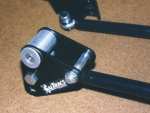
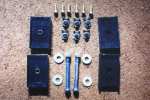
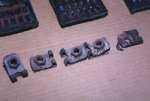
these bars is also better than I expected. All the parts were powdercoated black and the hardware was heavy duty
(photo 5). One complaint I had was that I had to go out and buy
new wrenches to fit the bolts because the nut and bolt sizes were 1-1/16" and 1-1/8". The largest wrench and socket I had
were only 1".
Since I would have to take apart the whole rear suspension to install the CalTracs, I ordered some new parts from espo.com. 4 polygraphite spring pads, 2 grade-8 bolts for the front spring
eye, 6 bolts for the front spring mount bracket and 6 clip nuts for the front spring mount bolts (photo 6). Great stuff but the spring eye bolts had regular nuts while the
original bolts had ny-lock nuts. I was going to use the original nuts when I discovered they were a fine thread and the
new bolts were a corse thread. I was thinking about buying ny-lock nuts but then I thought if I used a little Blue thread
lock I'd be OK. I can always go out later and get ny-lock nuts.
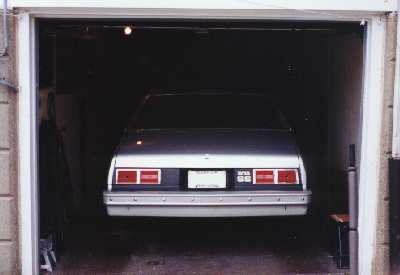
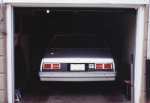
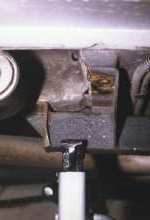
Disassembly took place in my one car garage (photo 7)
and went easier that I thought in some areas but harder than expected in others. The car was jacked up and I placed jack
stands under the frame connectors. I then lowered the rear axle onto another set of jack stands and kept the floor jack
under the center section. After I removed the wheels and shocks I unbolted the front catch loop of the Lakewood bars and
removed the U-bolt nuts. This allowed the Lakewood bars to come off. Then I jacked up the axle housing off the leaf springs
and removed the stock rubber spring pads. Next off were the 6 bolts (3 per side) that hold the front mount brackets to the
body. Use lots of oil because these tend to break when being removed. All 6 came out much easier than I thought. Then I
unbolted the rear shackles and pulled the springs out (photo 8)
. This all was much easier than I thought it would be but it was also where the difficulty would start.
The nut for the spring eye bolt came off easily but the bolt would not slide out. I used an impact wrench to spin the bolt
but it would not budge. Trying to salvage the bolt I tried to have it pressed out. What I later discovered was that the
bolt had seized to the inner metal sleeve of the front bushing. When I tried to press it out, the sleeve bent and ruined
the driver side front mount (photo 9). CRAP! I used a
cut-off wheel to remove the bolt heads and the other end of the bolts and pried the spring out of the mounts
(photo 10). The passenger side was undamaged but the driver
side mount would need replacing. Once the bolts and mounts were off, the bushings came out easily and the new aluminum
bushings pressed in with no problems (photo 11). Enough
for one day. I'll need to find a new driver side mount.
That was Saturday (2/12/00) and I spent much of the next week trying to track down a new mount. I took off work on
Thursday (2/17/00) to at least install the passenger side bar. I started that day by installing the new clip nuts in the
frame. Good thing I did because all 6 were cracked (photo 13)
. The nuts were OK and would have held but the clip portion that holds the nut in place is what was cracked
and probably would have broken off. The only bad part was the 6 new bolts they sent were shorter than the originals. At $3
it's not worth sending them back. I'll just wire brush the originals and use some oil. Fortunately, they are the same
thread as the new clip nuts.
Installing the clip nuts was a chore of it's own. The bolt-in subframe connectors were the main reason I needed the longer
front mount bolts. Since the car was sitting on jack stands placed under the back of the connectors
(photo 14), I had to jack up the body slightly to take the
weight off the connectors to get the old clips out and the new ones in. After that, I assembled the passenger side mount
and installed the passenger side spring in the car (photo 15)
. NOTE: use lots of anti-seize on the bushing sleeve and bolt to prevent it for seizing like the original did.
I was checking the front assembly to make sure it moved freely and noticed that the nut end of the bolt that holds the
front rod end in was hitting the subframe connector. The solution was easy: I removed the bolt and threaded it in from the
other side. The bolt head was thinner than the nut and did not hit the connector. I then bolted the driver side spring to
the rear shackles and left the front of the spring to hang while I locate a front mount. NOTE: leave the rear shackle
bolts hand tight only until the car is back on all 4 wheels. When the weight of the car is on the springs, then tighten up
the rear shackle bolts. This prevents the bushings from binding.
I spent Saturday (2/19/00) morning tracking down a new driver side mount. I went to a salvage yard about an hour away who
has helped me before (Rossi Salvage, 1700 E Dekalb Pike, King Of Prussia, PA 19406-0213,
610-265-0643). I went through a bin of just brackets and I found a few passenger side mounts and a few
Camaro mounts (67-81 Camaro mounts are different) but no driver side mounts. I then checked the rack of leaf springs and
sure enough I found a good driver side mount still on a mono-leaf spring from a 1970 Nova. The guy at the yard got the nut
off but just like mine, the bolt was seized to the bushing sleeve. Nothing a torch couldn't fix. 10 minutes later I had a
very hot but undamaged driver side mount. Yeah!
Once I got home the job went quickly. The passenger side was already completed and I quickly cleaned up the new bracket
and installed it. Then I installed the new spring pads and lowered the rear back onto the springs. Installed the lower
spring mounts (photo 16) and attached the links
(photo 19). The adjusting lock nut for the lower links are
1-1/8" and only an open-end wrench will work. I had to buy a 1-1/8" open-end wrench to fit and since the length of
wrenches that size is very long, I had to cut it down to be able to adjust the preload without having to jack the car very
high in the air.
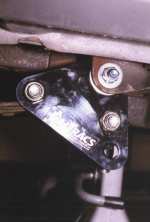
The CalTracs are lower to the ground than the Lakewood bars at the spring mount plates
(photo 21) but they give more ground clearance at the front of
the spring. The bottom of the rear rod end is approx 1/4" lower than the bottom of my 15" rims. Even if both rear tires go
flat, I don't see a problem with them hitting the ground.
Results: The first time at the track I actually bogged the motor from too much traction! What a great problem to have!
After re-adjusting CalTracs I matched my best 60' times and ran my best ET ever (but only by a few hundredths). The engine
power is now the limiting factor. I can safely start adding power knowing that my CalTracs will give me the traction I
need.
|